おさらいと事前知識
手順
- プロジェクト・Azureリソースの作成とインストール作業
- 認証機能の実装
- ストレージの作成とAPIの実装
- フロントエンドアプリの実装と動作確認 ←このでやること
フロントエンドアプリの実装
Material-UIのData Gridをインストールし、ファイル一覧を表示するための表と、ファイルを管理するためのボタンを実装します。
srcフォルダ下に、SelectableTable.tsxファイルを新規作成します。
npm i @material-ui/data-gridAPIを利用する際は、/api/storageエンドポイントをHTTPメソッドやパラメータの有無で使い分けます。アップロードにはmultipart/form-dataを採用しているため、ヘッダーを付け加える必要があります。
// ファイルダウンロード
await axios.get("/api/storage/[ファイル名]");
// ファイル一覧取得
await axios.get("/api/storage");
// ファイルアップロード
await axios.post("/api/storage", form, {headers: { "content-type": "multipart/form-data" }});
// ファイル削除
await axios.delete("/api/storage/[ファイル名]");
import { useState, FC, useCallback, useEffect, useRef } from "react";
import { Button, ButtonGroup } from "@material-ui/core";
import {
DataGrid,
GridColumns,
GridRowData,
GridRowId,
} from "@material-ui/data-grid";
import axios from "axios";
type FileListResponse = {
name: string;
size: number;
};
const uploadFiles = async (files: File[]) => {
const form = new FormData();
files.forEach((file) => form.append("file", file, file.name));
const res = await axios.post(`/api/storage`, form, {
headers: { "content-type": "multipart/form-data" },
});
return res;
};
const downloadFile = async (selectedFileName: string) => {
const res = await axios.get(`/api/storage/${selectedFileName}`);
const url = window.URL.createObjectURL(new Blob([res.data]));
const elm = document.createElement("a");
document.body.appendChild(elm);
elm.href = url;
elm.download = selectedFileName;
elm.click();
elm.remove();
URL.revokeObjectURL(url);
};
const fetchFiles = async () => {
const res = await axios.get<FileListResponse[]>("/api/storage");
const contents: GridRowData[] = res.data.map((d, index) => {
return { id: index, fileName: d.name, fileSize: d.size };
});
return contents;
};
const columns: GridColumns = [
{ field: "id", width: 90, headerName: "ID" },
{ field: "fileName", headerName: "ファイル名", width: 280 },
{ field: "fileSize", headerName: "サイズ", width: 140 },
];
const SelectableTable: FC = () => {
const [selectedRowIds, setSelectedRowId] = useState<GridRowId[]>([]);
const [selectedFileCount, setSelectedFileCount] = useState(0);
const [rows, setRows] = useState<GridRowData[]>([]);
const inputFile = useRef<HTMLInputElement>(null);
useEffect(() => {
(async function () {
setRows(await fetchFiles());
})();
}, []);
const onSelectionChange = useCallback((ids: GridRowId[]) => {
setSelectedRowId(ids);
setSelectedFileCount(ids.length);
}, []);
return (
<div style={{ height: 650, width: "100%" }}>
<ButtonGroup>
<Button variant="contained" onClick={() => inputFile?.current?.click()}>
<input
type="file"
multiple
ref={inputFile}
style={{ display: "none" }}
onChange={async (e) => {
if (e.currentTarget.files) {
await uploadFiles(Array.from(e.currentTarget.files));
setRows(await fetchFiles());
}
}}
/>
アップロード
</Button>
<Button
variant="contained"
onClick={async () => {
setRows(await fetchFiles());
}}
>
更新
</Button>
<Button
onClick={async () => {
for await (const id of selectedRowIds) {
await downloadFile(rows[id as number].fileName);
}
}}
disabled={selectedFileCount < 1}
variant="contained"
>
ダウンロード
</Button>
<Button
disabled={selectedFileCount < 1}
variant="contained"
onClick={async () => {
for await (const id of selectedRowIds) {
await axios.delete(`/api/storage/${rows[id as number].fileName}`);
}
setRows(await fetchFiles());
}}
>
削除
</Button>
</ButtonGroup>
<DataGrid
onSelectionModelChange={(ids) => onSelectionChange(ids)}
rows={rows}
columns={columns}
pageSize={25}
checkboxSelection
/>
</div>
);
};
export default SelectableTable;
実装が終わったらApp.tsxを編集して、動作確認用にユーザー情報とHello Worldを表示させていた箇所を削除して作成したコンポーネントを表示させるようにします。
function App() {
  const [clientPrincipal, setClientPrincipal] = useState<ClientPrincipal>(null);
  useEffect(() => {
    (async function () {
      setClientPrincipal(await getUserInfo());
    })();
  }, []);
  return (
    <Box>
      <MenuAppBar userName={clientPrincipal?.userDetails} />
      <Container maxWidth="md">
        <Box my={5}>
          {clientPrincipal ? (
            <SelectableTable />
          ) : (
            <Container maxWidth="sm">
...
動作確認
上記の作業を終えたら、動作確認をしましょう。再度ビルドしてからアプリケーションを実行します。
npm run build --prefix api
swa start http://localhost:3000 --run 'npm start' --api api
デプロイ
問題なく動作することが確認できたら、作成したアプリとAPIをデプロイします。Azure Static Web Appsを作成した際に、デプロイ用のワークフローが自動でリポジトリに追加されているので、今までの変更をリモートリポジトリにプッシュすることで、運用環境にデプロイされます。
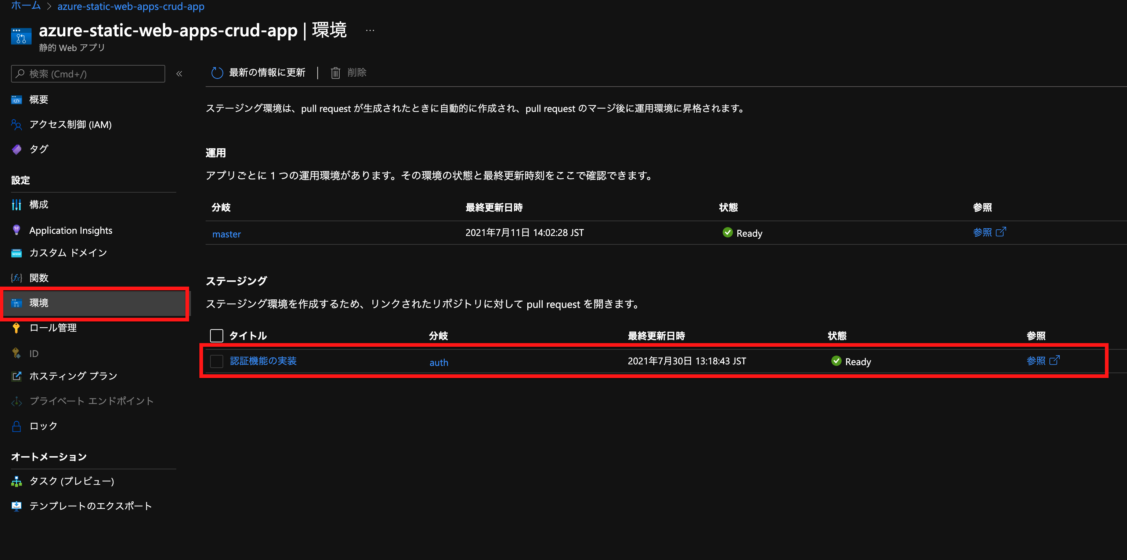
master(main)以外のブランチで作業していた場合は、PR(Pull Request)を作成することで、ステージング環境(運用前環境)にデプロイされます。デプロイが完了すると、PRにURL付きでコメントされます。Freeプランでは3つまでステージング環境を利用でき、運用環境へデプロイする前に動作を確認することができます。

まとめ
この記事では、ファイル管理アプリを題材に、Azure Static Web Appsでサーバーレス SPAを作る方法を学んできました。
フロントエンドアプリとAPIを同じリポジトリで管理できることや、単一のAzureサービスだけで認証機能付きのサーバーレス SPAが開発できてしまうことなど、Azure Static Web Appsならではの魅力を感じていただけたと思います。
また、今回作成したコードはこちらで公開しているので、なにか問題や質問などがあれば、当サイトにお問い合わせいただくか、Issueを投げるなどしてください。